
This is our second project, and it’s a bit more challenging than the Bluetooth race car we worked on before, mainly because it involves automation. With more sensors and an algorithm to help it choose the best path based on its surroundings, it’s definitely a step up. However, it’s still a great beginner project and a solid starting point for all of us!
Technical rundown
Elements used
4 DC Motors
4 Wheels
Car Chassis
L289N DC Motor Driver
Arduino UNO
3 Ultrasonic sensors
Jumper cables
Button
Circuit design
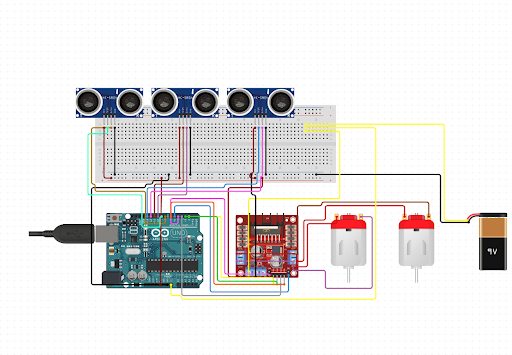
This circuit was designed by Rand Hamid
The Code
					// Define the motor driver pins connected to the Arduino
#define IN1 8    // Input 1 for Motor A
#define IN2 7    // Input 2 for Motor A
#define IN3 6    // Input 1 for Motor B
#define IN4 5    // Input 2 for Motor B

// Define the ultrasonic sensor pins
#define TRIG_FRONT 9
#define ECHO_FRONT 10
#define TRIG_LEFT 11
#define ECHO_LEFT 12
#define TRIG_RIGHT 13
#define ECHO_RIGHT A0

// Define the obstacle detection distance threshold (in cm)
#define OBSTACLE_DISTANCE 20

// Setup function
void setup() {
  // Set all motor driver pins as output
  pinMode(IN1, OUTPUT);
  pinMode(IN2, OUTPUT);
  pinMode(IN3, OUTPUT);
  pinMode(IN4, OUTPUT);

  // Set all ultrasonic sensor pins as output/input
  pinMode(TRIG_FRONT, OUTPUT);
  pinMode(ECHO_FRONT, INPUT);
  pinMode(TRIG_LEFT, OUTPUT);
  pinMode(ECHO_LEFT, INPUT);
  pinMode(TRIG_RIGHT, OUTPUT);
  pinMode(ECHO_RIGHT, INPUT);

  // Start serial communication for debugging
  Serial.begin(9600);
}

// Loop function
void loop() {
  // Measure distances from the three ultrasonic sensors
  int distanceFront = getDistance(TRIG_FRONT, ECHO_FRONT);
  int distanceLeft = getDistance(TRIG_LEFT, ECHO_LEFT);
  int distanceRight = getDistance(TRIG_RIGHT, ECHO_RIGHT);

  // Print distances for debugging
  Serial.print("Front: ");
  Serial.print(distanceFront);
  Serial.print(" cm, Left: ");
  Serial.print(distanceLeft);
  Serial.print(" cm, Right: ");
  Serial.println(distanceRight);

  // Obstacle avoidance logic
  if (distanceFront > OBSTACLE_DISTANCE) {
    // No obstacle ahead, move forward
    moveForward();
  } else {
    // Obstacle detected ahead, decide to turn left or right
    if (distanceLeft > distanceRight) {
      turnLeft();
    } else {
      turnRight();
    }
  }

  delay(100); // Small delay to stabilize sensor readings
}

// Function to measure distance using the ultrasonic sensor
int getDistance(int trigPin, int echoPin) {
  digitalWrite(trigPin, LOW);
  delayMicroseconds(2);
  digitalWrite(trigPin, HIGH);
  delayMicroseconds(10);
  digitalWrite(trigPin, LOW);

  long duration = pulseIn(echoPin, HIGH);
  int distance = duration * 0.034 / 2; // Convert time to distance in cm
  return distance;
}

// Function to move the car forward
void moveForward() {
  digitalWrite(IN1, HIGH);
  digitalWrite(IN2, LOW);
  digitalWrite(IN3, HIGH);
  digitalWrite(IN4, LOW);
}

// Function to turn the car left
void turnLeft() {
  digitalWrite(IN1, LOW);
  digitalWrite(IN2, HIGH);
  digitalWrite(IN3, HIGH);
  digitalWrite(IN4, LOW);
  delay(500); // Adjust delay for turning angle
}

// Function to turn the car right
void turnRight() {
  digitalWrite(IN1, HIGH);
  digitalWrite(IN2, LOW);
  digitalWrite(IN3, LOW);
  digitalWrite(IN4, HIGH);
  delay(500); // Adjust delay for turning angle
}

// Function to stop the car
void stopCar() {
  digitalWrite(IN1, LOW);
  digitalWrite(IN2, LOW);
  digitalWrite(IN3, LOW);
  digitalWrite(IN4, LOW);
}
Our Experience
Overall, the hardware side went smoothly. Instead of using a breadboard like we did in testing, we integrated the components directly onto the car in real life. The only time we used the breadboard was for the power connections since we didn’t have a soldering iron at the time. Initially, the power connections were a bit messy, but once we used the breadboard, everything looked much more organized.

The programming part, on the other hand, was a bit tricky. The car wasn’t moving as expected and kept bumping into obstacles randomly. After some research, we realized that the library we were using for the ultrasonic sensors wasn’t suitable for our project. So, we decided to write our own code, which turned out to be quite simple
Ultrasonic sensor code:
					// Function to measure distance using the ultrasonic sensor
int getDistance(int trigPin, int echoPin) {
  digitalWrite(trigPin, LOW);
  delayMicroseconds(2);
  digitalWrite(trigPin, HIGH);
  delayMicroseconds(10);
  digitalWrite(trigPin, LOW);

  long duration = pulseIn(echoPin, HIGH);
  int distance = duration * 0.034 / 2; // Convert time to distance in cm
  return distance;
Once we confirmed that the car was detecting obstacles and calculating distances correctly, the next step was to figure out the best algorithm to use. After brainstorming and trying out different ideas, we ended up getting help from ChatGPT! 😂
It helped us spot our mistakes and surprised us with much simpler ways to write the code. One major thing it taught us was that instead of writing each command for every possible situation— which was why our code got so complicated and eventually stopped working— we could just introduce a variable to call the commands. In the end, using AI to finish the task made us realize what areas we need to focus on to learn better and improve.